End grains are difficult to deal with when working with wood, especially if you aren’t properly educated and prepared to deal with this issue.
A lot of the time, you finish sanding something and are pleased with the look and feel, but after you apply the finish, the product suddenly appears as if it was made of different types of wood.
This is because the end grain will often soak up so much of the stain or finish that it looks too dark and doesn’t blend in with the overall piece.
So, what are the end grains of wood, why finishing them is important, and how to seal them correctly? I will be discussing all these and more in the following article…
What are the End Grains of Wood?
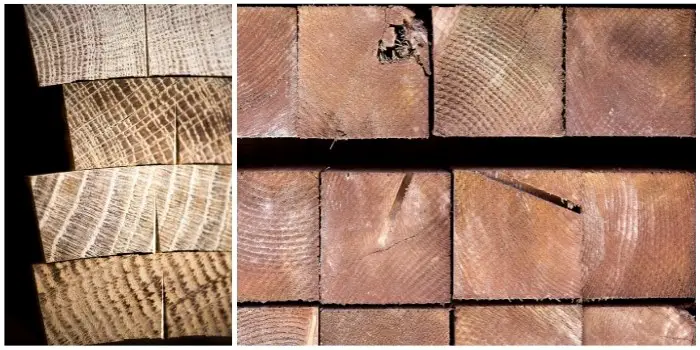
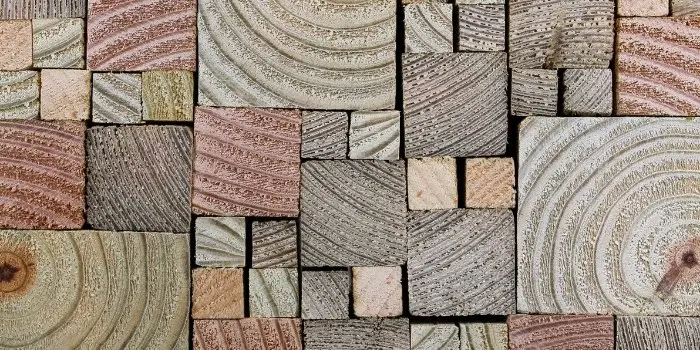
End grains of wood are the exposed surfaces of a tree’s trunk, branches, or roots.
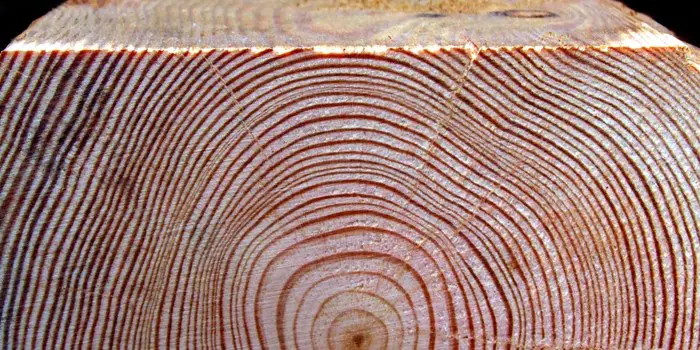
When cut into lumber, each piece of wood has two end grains. The annual growth rings of a tree are visible on the end grain surfaces.
On a wooden board, end grain refers to the surface of the wood that was cut perpendicular to the tree’s growth rings. These are usually the end, edge, and face grains.
In general, end grain wood is denser and stronger than other types of wood, making it ideal for certain types of projects.
With that said, the end grain of the wood is more absorbent and also more challenging to work with, so it is important to understand the fundamental properties of end grain wood before beginning a project.
Why It’s Crucial to Seal the End Grain?
Sealing the end grain of the wood is important because it is more absorbent than other types of wood.
This means that the end grain will absorb more moisture, which can cause the wood to swell and warp.
Mainly if you are working with end grain wood, it is essential to seal it before beginning your project. This will help protect the wood from moisture and ensure that your project turns out the way you want it to.
There are a few different ways to seal the end grain of the wood. You can use a clear sealer, such as wipe-on polyurethane, or you can stain the wood before sealing it.
Sealing end grain is also possible with glue, such as epoxy. But when choosing, it is important to note that the type of sealer you use will depend on the project you are working on.
For example, if you are making a cutting board, you will want to use a food-safe sealer so that the end grain is safe to cut on.
Staining and Sealing End Grains of Wood
Because the end grain often occurs in an area that is not so noticeable, you can usually get away with the difference in color without anyone noticing.
But, there are still some occasions when the difference maybe is too apparent, such as on a door frame or the top of a rail.
If you are using wood (with end grains) for these purposes, do keep in mind to finish it well.
Below, I offered some tips on staining and sealing the end grains for better protection. Do check them out before you start your project…
Step 1. Sand with high-grit sandpaper
Sanding the wood end grains more than needed can cause its pores to become clogged and reduce its absorption rate.
This is because a higher sandpaper grit creates finer sawdust and is more capable of getting into the wood’s pores.
This proves to be beneficial when staining, as clogging the pores means less of the stain will soak into it, so it will match the rest of the piece.
You can choose to work with either 180 or 240-grit sandpaper to see different results. If you sand with a grit higher than 240, you may even get better results than anticipated.
Take care to sand the ends in an even stroke, or else it can cause the end to look blotchy and uneven.
You can combine more than one sanding technique or even the sanding grit level to see if you can accomplish better results that way.
Step 2. Pre-seal the end grains with shellac
By sealing up the pores in the end grains of wood – before applying stain – the lesser stain will be able to get inside of them.
To achieve that, you can apply the shellac using a small paintbrush to keep it restricted to only the end grain and then let it dry.
Applying more than one coat of shellac is recommended to ensure the layer is thick enough to prevent the stain from seeping in.
Remember that it can take about an hour for the shellac to dry, so you’ll have to factor in that extra hour when setting out to do your wood project. This will add an extra hour to the time before you can get to work on finishing the piece.
Also, it may happen that with the shellac, it may come out looking darker.
If that’s something you do not need for your project, you might try other methods like applying some thinned wood glue.
If you’re going to use shellac, take care to choose shellac that is already mixed and wax-free. Otherwise, the wax can get in the way of adhesion later on.
Step 4. Apply wood conditioner to the end grains
Wood conditioner is a beneficial product – before you put end sealer on wood – because you don’t need to wait for it to dry.
The result will be an end grain that is somewhat blotchy but in a way that aligns with the wood’s natural grain.
The primary role of using the pre-stain wood conditioner is to lessen the absorption of stain and give the stain a good overall finish.
Step 5. Apply the stain to the end grains with a rag
After applying the pre-stain wood conditioner, apply your preferred stain to the end grains with a foam brush and wipe it away with a rag.
While a foam brush may work on larger surfaces and logs, applying the stain with a piece of rag will be easier on thin ends and edges of the boards, as it will give you better control. Also, you don’t have to wait around for it to dry.
To do it, simply apply the stain with a rag by dipping it into the stain and then blotting it onto another rag. As the first one isn’t heavily soaked with a stain, it can be used to wipe onto the end grain.
Whatever applicator you choose, make sure to do it to match the rest of the wood grains on the surface.
If the stain is too light on the first coat, you can just apply some more of the stain on the ends.
This isn’t an option when using a foam brush since the wood will immediately absorb everything applied right away.
Sealing the End Grains of Wood with Glue
The glue will clog the wood’s pores, stopping the stain from getting into the wood. So, while it will seal the wood end grains, staining or recoloring afterward may be difficult.
If you desire to seal the wood end grains using the glue method, you can start by mixing some glue with a bit of water to make the texture that quickly soaks into the wood.
Then, brush that diluted glue down onto the edges of the piece of wood.
You will need to wait for approximately one hour for it to dry, which, like the shellac, might get in the way of a speedy wood-finishing project.
Remember that a higher glue concentration (with more glue and less water) is thought to provide a better color outcome.
If you want even darker, you can also consider mixing water-soluble powdered dyes or pigments directly into the wood glue.
With this wood glue tinting method, you can give your wood end grains darker results than you get with the other methods I mentioned above.
Be mindful not to combine wood glue, shellac, or wood conditioner products, as they each rely on chemicals to clog up the pores.
Do You Need to Seal the Cut Ends of Pressure Treated Wood?
No, you don’t necessarily need to seal the cut ends of pressure-treated wood. The chemicals in the lumber are designed to protect the wood from rot and decay.
However, you might want to seal the end grains of pressure-treated lumber if you plan to paint or stain the lumber.
The sealer will help to prevent the chemicals in the pressure-treated lumber from leaching out and affecting the paint or stain color.
If you do decide to seal the cut ends of pressure-treated lumber, be sure to use a product that is safe for use on pressure-treated lumber.
One such product is Thompsons WaterSeal Advanced Natural Wood Protector. This product is safe for use on all types of pressure-treated lumber, including ACQ-treated lumber.
ACQ stands for Alkaline Copper Quaternary. This type of pressure-treated lumber is treated with a copper-based preservative and is often used in outdoor projects, such as garden beds, decks, fences, and picnic tables.
If you Wet the Wood, Will It Be Faster to Sand and Seal Than If Dried?
It will depend on the type of wood, how wet it is, and how you plan to seal it.
However, in general, it is best to allow the wood to dry completely before sanding and sealing.
If the wood is too wet, it can be difficult to sand evenly.
And, if you seal the wood before it is completely dry, you run the risk of trapping moisture in the wood, which can lead to rot and decay.
If you do wet the wood by mistake, be sure to allow it to dry completely before sanding and sealing.
Final Thoughts
No matter which method you use for sealing end grains, it is highly recommended that you test the methods out on wood scraps before you commit to staining your final piece with it.
If you do this, you’ll know what it will look like before you continue, and you can handle any surprises you might run into.
While sealing, ensure that you apply the sealer evenly and allow it to dry completely before continuing with your project.
Share the post "How to Finish the End Grains – Staining and Sealing Tips"

We are constantly finding new ways to update our home exteriors. If you are a bit tight on budget, renovating Read more

Cypress wood has been used for thousands of years in shipbuilding, so it is well-known for its water-resistance properties. Due Read more

We all know - Heat is the enemy of wood. When you place a hot item on a wooden surface Read more

If you are looking to upgrade your dining room but are on a budget, then painting your oak table and Read more

Hi, I am Mark Garner a professional carpenter, woodworker, and DIY painter. I live in the small city of Peoria, Arizona as a semi-retired woodworker. I have started this blog with a simple motive to help you with my wood experience in this sector. If you like to know more about what I love doing and how it all got started, you can check more about me here.