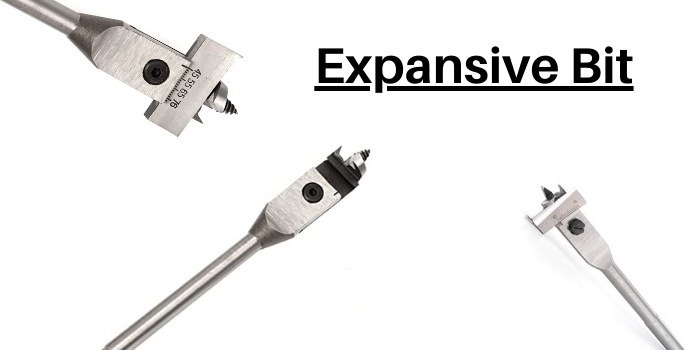
Put simply, an expansive drill bit is a tool used to bore holes of different widths into variable materials.
The bits themselves are created with cutters that are adjustable. This means that they can be expanded or retracted depending on the need. This allows for one bit to do the job of several, saving time and expense.
The functional part of the bit is known as the cutter. You may hear expansive bits called ‘adjustable bits.’
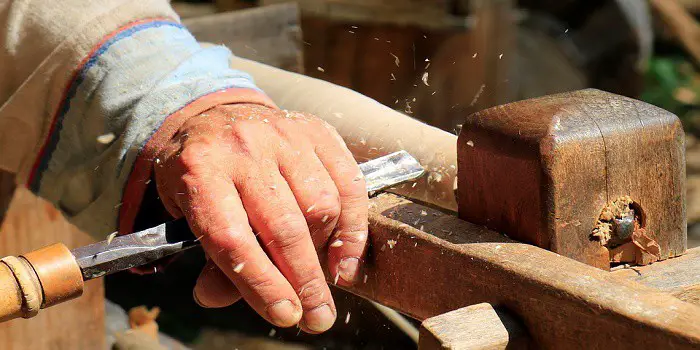
You can find expansive bits used mostly to bore holes in wood. However, they can also be used for other materials such as plasterboard or plastic.
Metal is generally too hard for expansive drill bits to work. Despite their obvious versatility, expansive bits are now considered specialty tools. This is because other types of wood bits have become less expensive.
How Does Expansive Bit Work?
At first glance, the expansive bit works in a similar fashion to an auger – a spur cuts the outer edge of the borehole.
The waste material created is cleared by two sharp cutting lips that clean it all away.
As the bit turns, the thread on the guide screw bites into the material and draws it down, which means less force is needed.
The primary spur, which is located closer to the guide screw, will contact the material first when the primary lip creates a small hole.
Then, the outrigger cutter spur, followed by the cutter lip, creates a wider hole where the user sets the width of the wider hole.
In other words, two holes are being cut, a pilot hole and the drilling hole, which eventually becomes a single hole in the material.
What are Expansive Bits Used For?
You will find expansive bits used in projects that require different sizes of holes in the same material.
Many electricians and plumbers use expansive bits. They are used to drill through wooden boards to create holes for cables or pipes. They can even create wider holes for bundles of cables.
Another everyday use of expansive bits is to create a round hole in the doors to accommodate the locking mechanism.
Because of their versatility, the bit can be used to create the large hole that holds the lock. Plus, they can be used on the side of the door to create the holes necessary for the lock to engage with the door frame.
Because you only need to purchase one bit, an expansive bit may save you a considerable amount of money over purchasing a set of bits.
Plus, the expansive bit may save time as well since you can adjust it as needed without having to remove it from the drill.
How to Use an Expansive Bit Correctly?
Using an expansive drill bit is straightforward once you get hold of it and get some practice. Here are the steps to follow…
a) Attach and Bore:
You’ll need to attach the bit to the appropriate brace. Be sure to set the width and secure it with a chuck.
Next, you’ll want to slowly bore the bit into the material to keep the hole clean.
Plus, because of the design, not as much force is needed to keep the bit on target when creating the hole.
b) Break the Surface:
Check the reverse side at regular intervals until the guide screw breaks through.
Then turn the material over and drill from the bottom side.
Otherwise, if you keep drilling, the material will tear outwards, creating a messy exit point.
Of course, if you are drilling through the material in which you cannot turn it over, such as plasterboard, just keep drilling until the bit is all the way through.
To protect your drill, set the revolutions at the lowest speed to help prevent overheating.
If you feel the motor starts to overheat, stop drilling. Remember that you only need apply light pressure as the guide drill is boring into the material.
What are the Parts of An Expansive Bit?
There are several parts to an expansive bit. Understanding the function and purpose of each part will help you better use the expansive bit.
Guide Screw:
Sometimes called the ‘gimlet point’, this helps pull the bit through the material.
As the bit rotates, the spiral head of the guide screw pulls the bit into the material right from the tip. Because of the guide screw, less pressure is needed.
The downside is that guide screws may be too aggressive depending on the hardness of the material.
The result is a lack of control when driving the bit using a drill press. This is why you will find some expansive bits with gimlet points and no thread.
Lips:
There are two types of lips on an expansive bit, the primary and outrigger.
The primary lip is located near the guide screw. Its job is to shave out the material between the place where the guide screw penetrates and the primary spur.
The purpose of the primary lip is to create a guide hole that keeps the bit pressing forward.
The outrigger lip can be seen along the bottom edge of the outrigger cutter. This operates in the same manner as the primary lip.
The chisel-like blade is flat and scrapes out the material from the borehole. It is also responsible for cutting the material to the proper diameter.
The outrigger lip accomplishes most of the excess material that is removed from the borehole.
Locking Screw:
Sometimes called the ‘adjuster screw’ depending on the type of expansive bit being used, this will be located just above the outrigger cutter.
There are two types of patents on this part of the locking screw.
The first is the Clark patent which has a detachable bit.
The bit is held in place by the locking screw. Tightening the screw pulls the two sections of the bit together, which clamps the adjustable cutter into position.
The Wright patent features an extendable cutter with cog teeth that cut along the upper surface of the material.
This is attached to the cog, so the blade pulls forward or backward as the adjuster screw is turned.
Outrigger Cutter:
Sometimes called the ‘cutter,’ this is the expandable or contracting part of the expansive bit.
You can alter the position of the cutter in terms of its location to the bit’s center. This allows the bit to create holes that are narrow or wide.
It’s called the cutter because its appearance is similar to a part of a ship’s bar, which is also called a cutter, that extends outward to keep the boat from capsizing.
The outrigger cutter has the same general appearance, although its function is somewhat different.
Spurs:
There are two types of spurs, the primary and outrigger. The primary spur is set in close proximity to the guide screw. It is one of the first parts to come into contact with the material.
The outrigger spur is located at the end of the outrigger cutter and is used to cut around the outer rim of the hole.
Shank:
If you look at the cross-section of the shank, you’ll know what type of driver should be used. You’ll need to look at the end of the shank to see its exact shape.
If the shape is hexagonal, it is primarily designed for drill presses and powered hand drills. However, if the shank is squire, it is designed to be used with a hand brace.
What are the Different Types of Expansive Bits?
There are two types of expansive bits, each named after the person who filed the patent for their respective designs.
They are known as the Wright patent and Clark patent bits.
They are different in terms of how the cutter is lengthened or shortened.
Wright Patent Bit:
Invented by Alfred M. Wright and patented in 1939, this version has adjustable cutters with teeth cut into the top.
You can adjust the length of the cutter by turning the adjuster screw.
The screw is part of a cog mechanism that pushes the cutter forward or backward using the teeth on the upper edge.
Clark Patent Bit:
Patented by William A. Clark in 1858, this version is more commonly found compared to the Wright patent bit.
This bit uses adjustable cutters that have no teeth on their upper edge. They attach to the main body of the bit using a wedge and clamp system.
Adjusting the bit requires loosening the lock screw and sliding the cutter to its desired length.
Then the screw is tightened, which sets the bit in place.
What are the Different Available Sizes of Expansive Bits?
The size of the bits will depend on the cutters being used.
Small cutters can bore holes from 5/8” up to 2” in diameter, depending on the brand used. Large cutters can bore holes from 7/8” up to 6”.
Most expansive bits are roughly 8” long, which is about the hole length that can be bored. However, expansive bits that are made for plumbing tend to be shorter, around 5” in length.
You may want to use some scrap material and create test holes first if you have never used an expansive bit before.
This will give you a good idea of how they work before applying them to your project.
Sharpening an Expansive Bit – Tips for Care & Maintenance
An expansive bit has several parts that need to be kept sharp if you want the tool to work properly.
With the lips, cutters, and guide screws being different shapes, you will need to use different techniques to keep all of them sharp and ready to use.
Body
The tip and cutting edges can be sharpened in a manner similar to sharpening an auger bit.
You should use an auger bit file that will sharpen the corners and spurs without wearing down other parts of the bit.
Sharpen the top of the primary lip with the file to get back its edge. Do not sharpen the bottom of the lip, or it will make the cutting edge too high to use properly.
Next, sharpen the inside of the primary spur. Do not sharpen the outside or it will change the profile of the tool and make it worthless.
Cutter
This is the most complex part of the tool, so you will need to obtain a whetstone.
Before you begin, you will need to prepare the whetstone by rounding off at least one of its edges. You can use a bench grinder to perform this task.
Next, run the curved part of the wet stone down the concave surface of the cutter to locate any bumps.
If there are, you need to grind them down. Do so until the edge is smooth. Now you are ready to sharpen the cutter.
Secure the whetstone on a solid surface. Place the cutter so the concave surface rests on the curved edge.
Now push the blade back and forth along the stone. Use light pressure and wet the stone occasionally to keep the friction in check.
The grit on the stone will eventually grind the blade until it is sharp.
Check the blade regularly until you feel that it is sharp. Remember not to sharpen the bottom or flat surface of the cutter. Otherwise, it will be unable to take away the waste wood efficiently.
Guide Screw
You should purchase some grinding paste. This compound will wear away imperfections on the surface that are difficult to reach.
To start the sharpening process, bore the guide screw into the wood, then remove the bit.
Add the grinding paste into the hole that was just made using a toothbrush, stick, or scoop. Now, reinsert the screw into the hole with the paste and turn it back and forth.
This will grind away all imperfections that are on the thread. It will also remove any dirt or grime that might’ve built up.
Once completed, you can now rinse away the paste by running the guide screw under a running faucet or using water-displacing oil, depending on the type of paste that you purchased.
Spur
You can sharpen the spur by using the auger bit file. Simply run it across the surface until the spur is sharpened. And now, you have fully sharpened your expansive bit, and it is ready for use.
As a part of proper maintenance, be sure to clean the expansive bit after every use to prevent the buildup of dirt, grime, and other particles.
Also, you can always spot-sharpen some parts of the bit when needed. This will keep it operating properly.
Share the post "What is an Expansive Bit – What is it Used For?"

One of the best ways to clean your yard of twigs, leaves, and tree branches after a storm is to Read more
Whether you have been working with wood all your life or just getting started, having the proper tools is a Read more
It’s possible to only use hand or manual tools when woodworking, but then it becomes a slower process. For certain Read more
If you have never used this, steel wool is a collection of very thin steel wires bundled together in the Read more

Hi, I am Mark Garner a professional carpenter, woodworker, and DIY painter. I live in the small city of Peoria, Arizona as a semi-retired woodworker. I have started this blog with a simple motive to help you with my wood experience in this sector. If you like to know more about what I love doing and how it all got started, you can check more about me here.