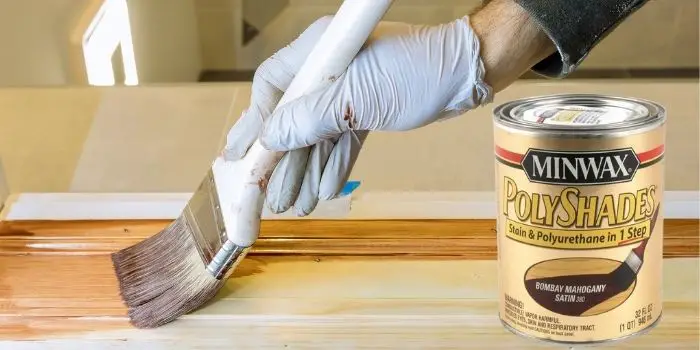
Minwax® PolyShades® is a product for interior use, and it’s designed to enhance the wood grains without the need to remove the existing finish.
In simple terms, PolyShades is an all-in-one product that works by combining the effects of beautiful, rich stain colors with long-lasting polyurethane protection.
Although the recommended way of application is with a premium quality natural bristle brush, you can use a cloth or a rag to apply Minwax PolyShades.
If you prefer spraying, PolyShades is also available in an aerosol can, making it easy for you to spray the areas that are hard to reach with a brush.
The only drawback with spraying is its cost when you need to spray larger areas.
Aerosol cans will not be as cost-effective as 1 Quart round cans that are less expensive to apply with a bristle brush.
Minwax® PolyShades® Product Details
| Coverage: | 120-150 sq. ft. per quart |
| Available Sheen: | Satin and Gloss |
| Application Tool: | High-quality natural bristle brush |
| Drying Time & Recoating: | It takes about 6 hours and should be recoated only after that much time has passed |
| Recommended Location & Usages: | Interior furniture, woodwork, doors, windows, moldings, cabinets, and other accessories |
| Color Options to Choose from: | American Chestnut, Antique Walnut, Classic Oak, Honey Pine, Olde Maple, Pecan, Royal Walnut, and Tudor |
How to Use Minwax Polyshades?
Minwax Polyshades is an excellent one-step wood finish option if you need to change the color of stripped, raw, unstained wood.
Not only that, but you can also use it on finished, unstripped surfaces (that are stained, painted, or varnished).
For application, you can follow the steps as follows…
Step 1 – Prepare the surface
To ensure proper adhesion, start by cleaning the surface with a piece of dry cloth.
Make sure that the wood is dry and free from any dirt and grime after the clean-up.
Then using a #220 fine-grade sandpaper, sand the surface gently in the direction of the grain to remove any grease or glue.
With a clean cloth, wipe away all the sanding dust.
Step 2 – Prepare the Polyshades
Stir your Minwax PolyShades in a can thoroughly using a wooden stick or a paint stirrer.
Make sure you do not use any thinner to thin the product.
Also, stir the product nicely before usage and occasionally during use.
After mixing this stain and polyurethane in one product, test it on a hidden or scrap wood piece to verify the color of your liking.
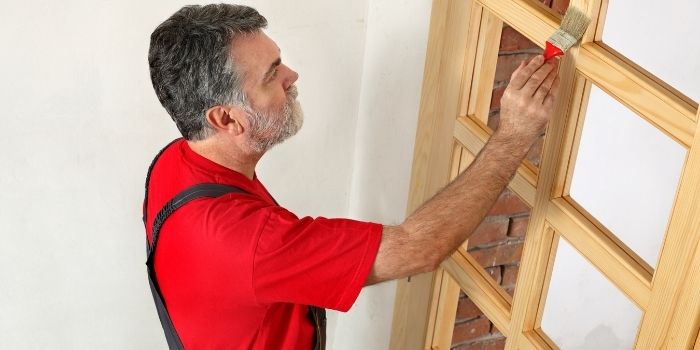
Step 3 – Start with the application
Once you are sure about the color, it’s time to apply the Polyshades with a natural bristle brush.
- Dip the bristles of the brush (approximately an inch) into the can
- Tap the bristles against the inside of the can to remove any excess
- Apply a thin, even coat in the direction of the wood grains, maintaining a wet edge
Step 4 – Allow the surface to dry
Depending on how thick you have applied the coating and the environmental conditions, Polyshades may take 6 to 8 hours to dry completely.
So, make sure you allow a minimum of 6 hours to dry the surface before applying the second coat.
Step 5 – Rub gently and recoat
Once the surface is dried, rub gently with fine steel wool.
Remove all the dust and apply a second very thin coat with a brush as you did before.
If, after the second coat, you feel you need to deepen the color further, you can apply an additional third coat of Polyshades to the surface.
Step 6 – Clean the brush and area
After it’s done and you are pleased with the Polyshades coating, clean the brushes, mixing stick, and any spills with some mineral spirits.
Also, after the application, it’s important to dispose of all the rags, sandpapers, steel wool, or other soaked waste products cautiously.
If discarded improperly, they can catch fire and can prove hazardous.
TIP:
If the wood surface you are treating is bare wood, it’s recommended to apply an oil-based Minwax® Pre-Stain Wood Conditioner, which will help you achieve uniform acceptance of the stain color with nicer results.
For the wood conditioner application, follow the directions provided by the manufacturer on the label.
Can I apply polyurethane over Minwax PolyShades?
It’s not recommended. Minwax PolyShades already contains polyurethane, so adding another layer can cause adhesion issues or an uneven finish.
If you want extra protection, lightly scuff-sand the surface and apply a compatible clear topcoat specifically designed for existing finishes.
Pros and Cons of Using Polyshades Finish
Minwax PolyShades is a two-in-one (staining + protective wood finishing) product that comes with various benefits along with a few drawbacks.
You should consider them for sure before you plan to treat your wood with them.
Advantages:
- Good coverage & easy application
- Dries fast without the need to wipe
- Offers enhanced beauty to wood grains
- It can be used over polyurethane or other wood finishes
- It can be applied using a brush, rag, or a sprayer
- Available in a variety of different colors and sheens to choose from
Disadvantages:
- Needs surface preparation
- Difficult to achieve an even stain color
- It’s challenging to apply evenly, especially for beginners
- It can only be used indoors and is not intended for wooden floors
- Contents are combustible, so keep them away from heat or open flame
Other than the above problems, Polyshades is a chemical-based finishing product that may emit fumes while applied.
As these fumes can be harmful (if inhaled), you should use proper safety precautions, like a face mask, gloves, etc., to stay protected.
Polyshades Aerosol vs. Regular Can – What’s Better?
PolyShades® aerosol offers all the same benefits as a regular 1-quart round can – but in an easy-to-use spray format.
The key reason why many DIYers and homeowners prefer this application method is its easy usage, where it’s hard to reach with a conventional paintbrush.
A few other benefits of using aerosol Polyshades spray cans are:
- It’s great for smaller projects
- Covers 40-50 square feet per can
- No worries about getting brush marks
- It can be used very easily on vertical surfaces as well
- No mess around and no need to clean the brushes after application
Before using the spray canister, protect the surfaces (from overspray) with painter’s tape.
Shake the can vigorously for 2 minutes and then spray in an even sweeping motion by holding the can 8″-10″ from the surface.
Be sure to apply at least two thin coats rather than one thicker one.
The first coat should be very light to seal the wood. After about 15 minutes, apply the second coat to add the color factor.
Let the Polyshades dry for about 6 hours. And if you feel getting a deeper color, spray a third coat.
Can You Spray Minwax Polyshades with a Sprayer Gun?
Yes, it’s possible.
If you want to spray it using an HVLP sprayer machine, I think it will not be a problem.
Miniwax Polyshades is just a kind of tinted poly and can be sprayed like poly without thinning.
Thinning the Polyshades (with water or any solvents) will dilute the color and can affect the overall finish, so it’s not recommended to thin the product.
The prep work for spraying a fresh coat of Polyshades is the same as I have mentioned above.
Once you have prepared the surface, apply Polyshades with a spray gun by holding it closer to the surface (generally 6 – 10 inches, depending on the type of sprayer).
Minwax PolyShades Brush Marks Issues – Easy Solutions and Tips
Many DIYers claim they hate using Minwax PolyShades because of the frustrating brush marks that can ruin an otherwise perfect project.
Take Alex, for example, who spent an entire weekend refinishing a coffee table, only to discover streaks and ridges that made the surface look amateurish.
It’s a common pain point—but with the right approach, it’s completely avoidable.
Why Brush Marks Happen?
PolyShades is a combination of stain and polyurethane. Its thicker formula means that if it isn’t applied carefully, the finish can build up unevenly, trapping brush strokes and drying with visible marks.
Solutions to Fix Minwax PolyShades Brush Marks
In short, proper brush selection, thin coats, and careful sanding are small investments in effort that deliver a visually flawless, durable, and protective Polyshades finish without any brush marks.
So, here’s what you actually need to keep in mind to enhance the beauty of the wood.
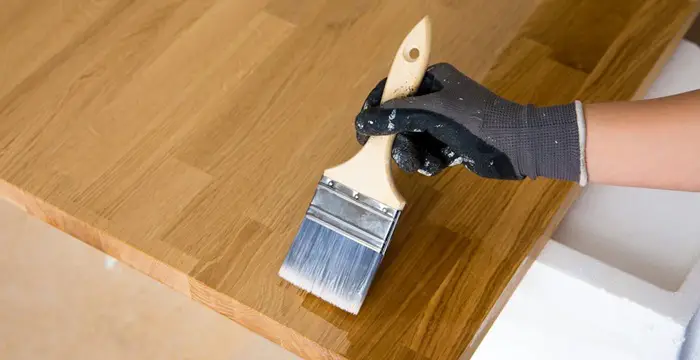
Use the Right Brush: Always choose a high-quality synthetic bristle brush.
Synthetic bristles maintain their shape, release the finish evenly, and resist splintering, which reduces streaks compared to cheap natural bristles.
Apply Thin, Even Coats: Thick coats increase surface tension and drying irregularities, causing brush marks.
Apply thin layers and allow each coat to dry fully (usually 2–3 hours under normal conditions) before adding the next. Multiple thin coats yield a deeper, more uniform color and a smooth finish.
Brush with the Grain: Always follow the wood grain, not across it.
This ensures the finish flows naturally along the lines of the wood, blending brush strokes rather than emphasizing them.
Maintain a Wet Edge: Work in manageable sections, blending each new section into the wet edge of the previous one.
This prevents lap marks and creates a seamless finish.
Sand Between Coats: Lightly sand with 220–320 grit sandpaper between coats to remove minor imperfections or raised grain.
Wipe away all dust with a tack cloth—any particles left behind can create tiny ridges that show up as brush marks.
Optional Advanced Tip: For ultra-smooth finishes, consider using a foam brush or a high-quality lint-free cloth for application.
Foam brushes help spread PolyShades evenly without leaving bristle lines, while wiping with a cloth allows for better control of stain penetration and finish thickness.
FAQs
Where to Buy Minwax Polyshades?
Minwax® products, such as Polyshades, is quite popular in the US and can be purchased very easily at most local paint stores and hardware stores.
You can also find their products at home centers that deal in hardware and DIY products.
Additionally, depending on your location, Polyshades may be available online at stores like Sherwin-Williams, Walmart, Amazon, Lowe’s, and Menards.
How Easy is it to Remove Polyshades from the Surface?
Removing fresh overspray (on surfaces like glass, plastic, wood, concrete, etc.) is easy with a piece of rag and mineral spirits.
But do not attempt to wipe off the excess when applying with a rag. You should immediately brush it out with a clean bristle brush.
Dried Polyshades can be scraped off cautiously from the surface with the help of a plastic putty knife.
Can I Use Minwax Polyshades Over Existing Finishes on Wood?
Yes, you can apply Minwax PolyShades over finishes like wood stain or polyurethane.
Make sure the existing finish is fully dry and remember to lightly sand the surface to scuff it, clean off all dust, and test on a small area first.
Then apply the product with a brush or cloth following the grain. Multiple coats can deepen the color, with light sanding between coats if needed.
Final Thoughts
Minwax® PolyShades® is basically a combination of wood and polyurethane in one single product.
Where stain is to add rich color to the wood, poly offers a tough protective coat and long-lasting protection.
Together they are a one-step product for enhancing the wood grains, which saves you good time and energy compared to when you need to stain with one product and protect the surface with another.
Before you use it, just make sure you learn where and how to apply the product for a best-finished look that doesn’t look blotchy.
Share the post "What is the Best Way to Apply Minwax Polyshades?"

We are constantly finding new ways to update our home exteriors. If you are a bit tight on budget, renovating Read more

Cypress wood has been used for thousands of years in shipbuilding, so it is well-known for its water-resistance properties. Due Read more

We all know - Heat is the enemy of wood. When you place a hot item on a wooden surface Read more

If you are looking to upgrade your dining room but are on a budget, then painting your oak table and Read more

Hi, I am Mark Garner a professional carpenter, woodworker, and DIY painter. I live in the small city of Peoria, Arizona as a semi-retired woodworker. I have started this blog with a simple motive to help you with my wood experience in this sector. If you like to know more about what I love doing and how it all got started, you can check more about me here.