One of the considerations for building a house, storage, or other structure with flooring is whether to include floor trusses as part of the build.
While floor trusses are not always necessary, they can speed up installation time for plumbing, HVAC, and electrical systems.
In addition, the floor trusses help to minimize the recoil or bounce that comes from walking on the floor itself, which is not supported above the foundation.
What follows is an explanation of what floor trusses are, the different types available, their advantages, and how to create and install a floor truss for your new home, building, or structure.
What are Floor Trusses?
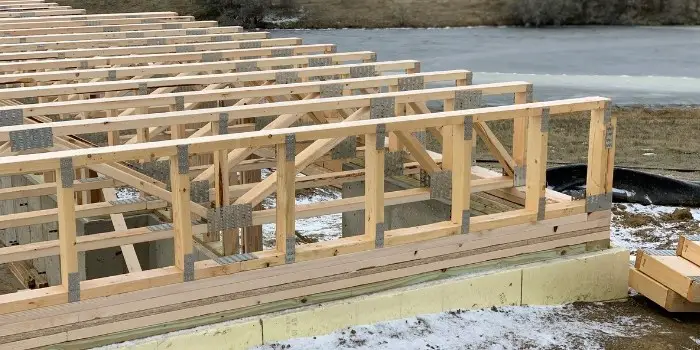
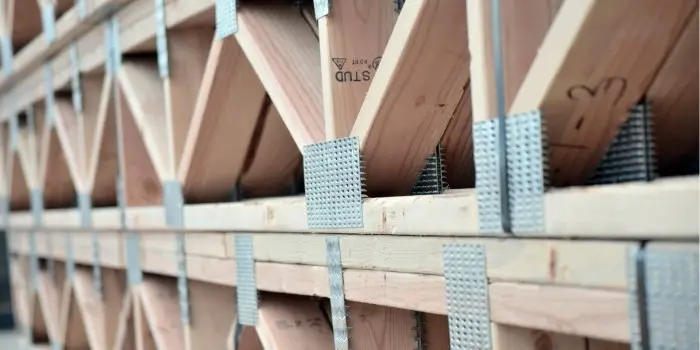
Floor trusses consist of a top and bottom rail, sometimes known as a chord, which is separated by vertical and diagonal components.
The result is a series of triangles formed from which the floor can be constructed on top.
The triangles create a webbing effect that not only supports the floor the trusses also allow for the placement of cables, plumbing, and vents.
Typical floor trusses are created using 2” x 3” or 2” x 4” construction-grade lumber, which is more readily available compared to 10” or 12” versions.
The joints are fastened with connector plates made from barbed heavy steel gauges.
Because the top and bottom chords are typically 2 ½” or 3 ½” wide, fastening the trusses to the subfloors or the ceiling is easier.
And since floor trusses improve structure efficiency and span greater distances, less material is used compared to other types of floor support.
Different Types of Floor Truss
Many types of floor trusses are used in modern buildings and structures. These include Open Web Floor Trusses, I-Joists, Solid Lumber Joists, and LVL Joists (Laminated Veneer Lumber).
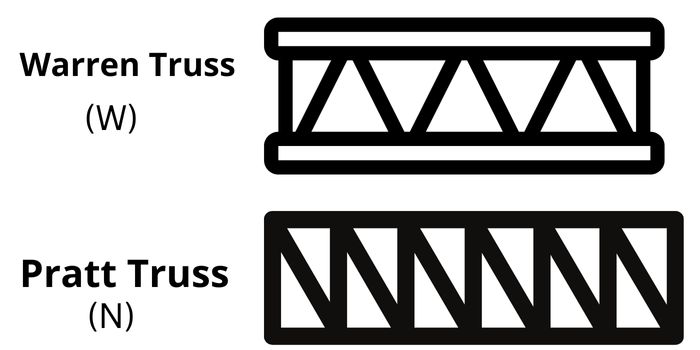
Based on the design and configuration, Pratt and Warren are two basic types of floor trusses. Each is similar in basic design, but some critical differences exist.
The Pratt truss is distinguished by its “N” web shape.
If you were to look at the truss from the side view, you would see a series of “N’s” in a row. The N configuration separates the top and bottom of the floor truss.
The Warren truss has a “W” web shape, which appears as a series of “W’s” if you look at the truss from the side view.
A popular variation of the Warren truss turns the W’s upside down to create a series of “M” shapes instead.
Of course, there are many variations of the floor truss, although virtually all are based on either the Pratt or Warren design.
How Much Do Floor Trusses Cost?
The cost of floor trusses will depend on several factors.
Most notably, the supplier and manufacturer who creates the truss. But it will also depend on the size, depth, width, length, and type of wood used. Do not forget about shipping the truss to the site.
In addition, while most floor trusses are custom-built for each site, some home-building suppliers may have different lengths and depths in stock for builds of standard dimensions.
Generally speaking, the deeper the floor truss, the more expensive it will be.
Simply put, you may pay upwards of $1.50 more per linear foot for 18” of depth compared to 11 ¼”. The less depth, the less you will pay per linear foot.
Since prices also fluctuate due to supply, time of year, and demand, you must account for all factors before shopping.
Advantages of a Floor Truss System
There are several benefits to a floor truss system.
First and foremost, the trusses do not require standard interior supports. The result is that a larger clearspan is possible, which creates greater flexibility.
A few other advantages also include the following:
- Fewer Building Materials Required
- Faster Building Time
- No Steel Beams to Place
- No Pads to Pour
- It makes HVAC Ducts, Cabling, and Plumbing Easier to Run.
In addition, the short nature of the lumber used in the trusses means less warping, twisting, or shrinking.
The ability to steal large lumber joists is also reduced, making them less likely to be stolen in great numbers.
Another advantage includes the design of the floor truss itself, which allows for insulation to be put into place, reducing both impact noise and overall sound.
This means a strong barrier that reduces overall noise, which otherwise travels through the floor.
Plus, no web stiffeners, squash blocks, rim or band boards, or blocking panels are required when using floor trusses which also means there is less waste with exact measurements used to create the trusses.

How to Build and Install a Floor Truss System?
Floor trusses are often customized to the specific plans for a home, building, or structure.
Once the plan is created, the floor trusses are designed to fit the allocated space.
The carpenters will construct the floor trusses, so they leave the designated space between the top and bottom chords.
The vertical and diagonal components are cut using a miter saw and set between the chords to provide support.
After all the components have been put in place, the connector plates or steel gussets are placed on the joints.
An automated roller is moved over the truss to press the barbs into the wood, which attaches to the connector plates.
Once that step is completed, the trusses are flipped over, the connector plates are tacked, and the roller goes over the top to press the barbs into the wood on that side.
This allows both sides to be correctly fastened to the connector plates. With that complete, the truss is lifted and placed for shipment to its destination.
Sometimes the truss may be pressed one final time before it is sent out for shipping.
Floor Trusses vs. I-Joists vs. Floor Joists – The Difference
Like floor trusses, I-joists are manufactured off-site to the specifications of the building.
These can be cut on-site, making them slightly less expensive than floor trusses, but they require drilling to place cables, plumbing, and the like. This means that the prices tend to even out.
I-joists have a top and bottom chord, like trusses, but the space is filled chiefly with ½” or 5/8’ plywood. To run cables, plumbing, or vents, you will need to make cuts in the I-joists. That is not true for floor trusses.
When it’s to the floor joist, they use solid dimensional lumber that is limited in span based on the wood species, its grade, depth, and other factors.
Typical floor joists will not span the exact distances compared to floor trusses. And in most cases, they will require support beams held on posts secured by concrete pads.
Floor joists will also have smaller openings compared to floor trusses. Plus, joists are more likely to crack, twist, and bounce than floor trusses. This is why floor joists require blocking to secure their position.
Floor trusses differ because they are less bouncy, more secure, and create large, open spaces between the top and bottom chords, making them easier to install than floor joists and I-joists.
This means that floor trusses are the more economical choice for a typical space.
That said, it is also true that floor trusses tend to be more expensive compared to floor joists of the same size; the price tends to even out due to the trusses being less expensive to install.
So, given the savings in material and labor, they are a popular choice for those constructing new homes and buildings that require cabling, venting, or plumbing.

Hi, I am Mark Garner a professional carpenter, woodworker, and DIY painter. I live in the small city of Peoria, Arizona as a semi-retired woodworker. I have started this blog with a simple motive to help you with my wood experience in this sector. If you like to know more about what I love doing and how it all got started, you can check more about me here.

