While not a true finishing technique, wood graining is the art of transforming surfaces to have the appearance of wood.
This can be used on different items and materials that range from metal doors to kitchen cabinets.
When the wood graining technique is perfected using the proper tools, the results can be widely varied.
The wood-graining appearance is created using a tool that can place wood stains or a wet glaze on walls, furniture, and other items.
To create the wood grain that you desire, you will need the proper tool to do the job.
Different Wood Graining Tools
What follows are just some of the wood-graining tools that are available. Each one has its specific use, so be sure to choose the right one for the job at hand.
1- Check Roller
To create the appearance of porous woods such as mahogany and oak, a check roller is used.
Check rollers are often used to create background textures, and they come in different sizes.
The most common size is 4,” and it consists of stainless-steel plates that move independently around a central piece which is normally metal.
2- Check Combs
The Check Comb is quite popular with those who want to create a faux wood grain appearance without having plenty of experience.
This is because the control provided by the check comb is more precise. You simply run the comb through the wet glaze until you achieve the desired effect.
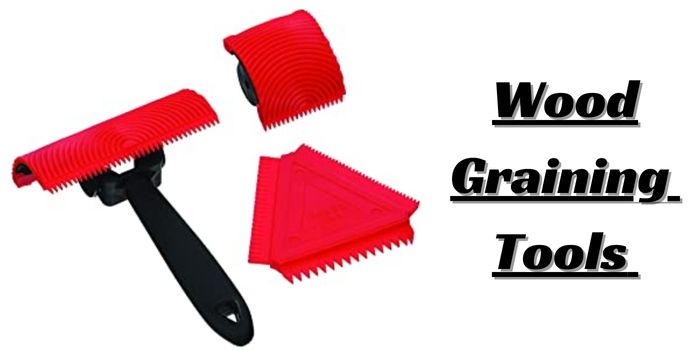
A check comb is triangular with teeth on all three sides. This allows for one check comb to create three different sizes of the faux wood grain.
You can even use more than one side when creating patterns on the surface for a more complex appearance.
3- Flogging Brush
This is a thick paintbrush that features long bristles often made from horsehair. When painting with this brush, it creates capillaries, as seen in finely finished wood.
After using primer, you paint the first layer with this brush. Then, once it dries, you use a standard brush for the second layer.
4- Overgraining Brush
This is a detailing device used to augment the appearance of faux wood grain created by another tool.
The brushes can range from quite narrow to somewhat wider depending on the effect that is desired.
You use an overgraining brush on a glaze that is still wet. By dragging the brush across, you create imperfections that create the faux wood appearance.
This is a tool that requires considerable practice and expertise to use correctly.
This regulates the overgraining brush to professionals since it requires considerable experience to get the results that you want.
5- Softening Brush
Softening brushes are normally made from the hair collected from animals. The bristles are set slightly apart, and it is used to smooth out the lines of the faux wood grain.
In other words, this is a brush used when finishing the work of another wood-graining tool.
6- Wood Graining Rocker
Perhaps the most frequently used of all faux wood graining tools, the wood grain rocker is literally “rocked” through the wet glaze to create the effect.
Normally used on furniture or walls, the wood grain rocker is crafted from rubber that features knots along with the wood graining effect.
There are different types of wood-graining rockers that vary in size and shape, but the way they are applied is generally the same.
7- Wood Graining Roller
Similar to the wood grain rocker, the main difference is found in the name. Instead of rocking the tool, you roll it through the wet glaze to achieve the desired results.
Another difference is that with the roller, you can change out the cylinders while using the same handle.
Choosing the Right Wood Graining Tool for the Job
To create the type of effect that you want, you will need to choose the right tool. For example, check combs are required for oak but not birch.
However, you will probably need at least two of the tools listed above to achieve the effect that you desire.
A check comb does offer different sizes for different results, but you probably still need a softening brush to make the appearance more realistic.
A wood grain rocker is also quite versatile, but the wood grain roller often comes in kits that allow you to attach different heads to suit the results that you want.
Even with the tools that are relatively easy to use, you will still need to practice scrap material to perfect your technique.
You can go for a rough look or improve your techniques and purchase the tools that make for sharper, more professional results.
Share the post "Wood Graining Tools – Different Types, Uses, & Techniques"

Hi, I am Mark Garner a professional carpenter, woodworker, and DIY painter. I live in the small city of Peoria, Arizona as a semi-retired woodworker. I have started this blog with a simple motive to help you with my wood experience in this sector. If you like to know more about what I love doing and how it all got started, you can check more about me here.


