Danish oil is a wonderful sealant for wood worktops.
Not only for oiling wooden worktops in your kitchen, but you can also use it for oiling your kitchenware, wood boxes, indoor/outdoor oak furniture, teak boats, and the list goes on.
Although Danish oil works great on all types of wood, the thing that concerns most people is that it can become sticky if not applied carefully.
Fixing the Sticky Danish Oil
When you notice that the freshly applied Danish oil on your worktop is not drying properly, it’s usually because the oiling has been done infelicitously and at an incorrect rate.
To prevent the sticky Danish oil problem on your worktops, you should apply not more than 1 liter of oil per 3m of the worktop.
Also, make sure that the batch of oil you use is fresh. Because if you use an old leftover oil, it can again turn tacky.
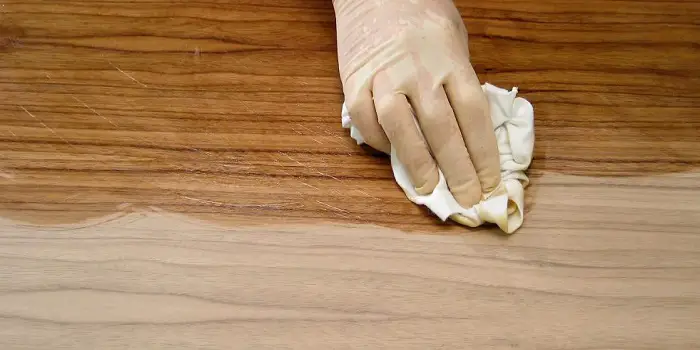
In case there is still a tacky oil patch a couple of days after the application, you can fix it with white spirits.
- Wet a piece of rag or cotton cloth in white spirits
- Gently wipe it over the tacky oil patch in circular motions
- Make sure you work on a small area at a time to dissolve the oil
- Once the tacky oil layer is removed, buff your worktop with a polishing pad

Common Reasons Why Danish Oil Stays Sticky
Other than not applying the oil in the right amount, there can be various other reasons why your freshly applied Danish oil surface still feels wet to the touch and sticky.
A few of them include the following:
1. The oil has turned bad
The shelf life of an unopened Danish oil can be as long as 10 to 20 years.
Depending on the environmental conditions, some brands, such as Rustins and Watco, may last less than that.
However, once you open up the can and store it in its original, tightly closed container in normal cool, dry conditions, it can last about one year without getting expired.
If you do not seal the container tight while storing, the oil can turn out to be treacle and spoil within a year or less.
This means that if you use this type of old Danish oil that has gone off on wood, the finished surface can leave tacky oil spots that can be hard to fix.
In some cases, even though the surface would appear to be fine, underneath, the oil is still not cured and can cause problems like wood rotting, spotting, and uneven finishes.
2. The oil you applied hasn’t cured
Freshly applied Danish oil finish can take around 24 to 48 hours to dry on the wood surface.
And up to 30 days or even longer to get cured completely underneath the surface deep into the wood fiber.
However, depending on humidity, temperature, ventilation, and a few other factors, it can take more or less time than this in some cases.
Remember, when we are talking about the ‘curing’ and ‘drying’ times of the oil, it’s very different.
- Oil drying refers to the evaporation of the oil from the surface, which turns the liquid coat into a thin solid clear film. The film will feel dry to the touch but is not very efficient in protecting the wood yet.
- Oil curing refers to the chemical reaction which occurs between the Danish oil solvent and wood to develop a strengthening power. This will actually make the wood resistant to scratches, corrosion, and abrasions.
If you start using your surface early without allowing enough time for Danish oil to get cured, it’s most likely that the tacky blotches will appear on the surface.
3. You haven’t wiped off excess oil between coats
Danish oil is a kind of popular wood finish, which is basically a mixture of oil, a varnish, and a thinner.
When buffing your wood surface with this oil, it’s important that you wipe off excess oil between successive coats, especially when you are applying more than two to three coats.
Many times, people try to apply thicker coats of oil so that it seeps fully into the wood pores.
Doing this isn’t a problem – if you wipe off excess oil that is left over.
But if you let the excess oil sit on the surface for a long, thinking that it will soak better into the wood grains, it can actually create problems later down the road.
So, IMO, allow the oil about 30 minutes to soak in. And then wipe down the surface using a rag dipped in mineral spirits.
Do not ever think of overapplying the excess Danish oil between coats. It will NEVER dry properly.
If the excess oil you forgot to wipe off has already dried on the surface, try using fine-grit sandpaper or a chemical stripper to remove the tacky layer.
How to Apply Danish Oil Correctly without Tackiness?
One of the most incredible things I like about the Danish Oil application is that you don’t need to be an expert to complete the job.
Even as a DIYer, you can successfully apply the oil, provided you follow the right steps.
Regardless of the type of timber, you used for your worktop, a few simple steps you need to follow include:
- Clean the worktop using a cloth to remove any dirt and dust from the surface
- Apply a thin Danish oil layer across the entire area of the top of the worktop, including the edges
- Wipe and buff the oil in the direction of the grain with a clean, dry, lint-free cloth
- Allow 3-5 hours to dry the oil and get soaked up in the wood
- Then apply a final second oil coat to achieve a nice sheen and an even coating without any patches
During the application, keep a piece of another clean cloth handy to wipe off any surplus oil between the coats.
Once you have applied Danish oil to the wood, it subsequently dries to a hard, water-resistant seal that is highly durable.
IMO, applying Danish oil will not make your worktop shine as varnish does, but it will obviously enhance its natural look while keeping it looking gorgeous for longer without warping.
How many coats of oil should you apply?
While 2 coats of Danish oil are enough for a worktop that’s already in place, you should consider applying 3 to 4 coats of oil if it’s a new kitchen worktop you are planning to install.
Also, remember, if it’s a new worktop you have oiled and installed, it’s crucial that you treat the surface with oil 2-3 times a week – for the first two to three weeks.
This will ensure that the surface stays well-protected and flawless for a long journey ahead.
As your wood worktop gets old, oiling 3-4 times a year with dutch oil should suffice to keep them in a tip-top shape.

How Can You Speed Up the Drying Process of Danish Oil Finish?
Maybe you are in a hurry and want to get a dry-to-touch surface sooner after the Danish oil application.
Don’t panic if your Danish oil does not dry soon.
Because there are a few easy tricks you can try to speed up the process.
a. Use dehumidifier
Using a dehumidifier can help with the drying time of the wood that is freshly oiled.
Especially if you live in an area with a humid climate, consider placing the device near your oil-coated wooden project.
This will lower the humidity of the place and will make the wood surface dry faster.
b. Turn up some heat
Increasing the temperature in your room can also help by making the conditions warmer, thereby lowering the drying time of the Danish oil.
To know if the coat of oil is dry to the touch, simply run your fingers over the coated surface.
If there is no smudging left behind, the oil is already dried.
c. Use your oscillating desk fan
Blowing air with a fan directly on the oil finish is also a quick way by which you can easily speed up the oil-drying process on wood.
However, before trying this simple method, be very cautious as the dust particles can also blow off with air, making your surface sticky with lots of dirt and dust.
I know it’s tempting for you to try these tricks.
But let me warn you – these tricks will not affect the curing process and the time it takes for the Danish oil to soak in & cure.
It will only make the surface feel dry; you still need to give it enough time if you want to get it cured completely.
Final Thoughts
Oiling wood with Danish oil helps the worktops better stand the kitchen’s challenges.
And the good thing is – unlike many other wood oils, Danish oil will dry fairly quickly without attracting any dust.
In case you do not want to leave your Danish oil tacky, there are prevention ways, tips, and strategies you can try.
Keep them in mind, and you will never ever have to worry about the Danish oil problems.
Share the post "Is Your Danish Oil Finish Sticky? Here’s What to Do"
Termites are recognized as one of the most troublesome pests all over the world. They are small and numerous and Read more

Our bedroom is a special place where we find relaxation and refresh after a hard day of toil - the Read more

Let’s be honest: buying a sofa is a bit like dating. In the beginning, it’s all about the looks. You Read more
Wooden furniture, trims, doors, and windows are so long-lasting that you can easily repair and reuse them even after they Read more

Hi, I am Mark Garner a professional carpenter, woodworker, and DIY painter. I live in the small city of Peoria, Arizona as a semi-retired woodworker. I have started this blog with a simple motive to help you with my wood experience in this sector. If you like to know more about what I love doing and how it all got started, you can check more about me here.