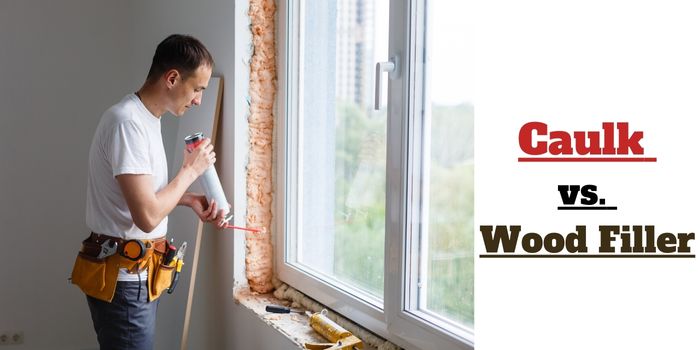
Caulk, wood filler, and painter’s putty are a few different types of fillers that are commonly used to fill holes, cracks, or gaps in walls, floors, and other surfaces.
Each type of filler comes with different ingredients and is used for different purposes. They also have advantages and disadvantages, so it’s important to choose the right type of filler for the job.
Especially when working on trims and baseboards, you want to make sure you use the right caulk or filler that can last long without cracking.
So, what to use on trims – caulking, a wood filler, or a putty?
While they all have one thing in common – to fill a hole or a gap – they each have their unique properties.
You should ideally use a caulk to fill gaps or joints between trim pieces that are exposed to the external elements. However, use wood filler to repair any nail holes, dents, and cracks in wood trim indoors. Painters’ putty is more suitable for repairing scratches when you need to paint over surfaces.
In the article below, I will get into more detail on each of these different types of fillers, their advantages and disadvantages, when to use them, and some tips on how to apply them.
So, let’s get started.
What is Caulk – The Pros and Cons?
Caulk is a kind of pliable filler substance that is made of silicone, latex, or acrylic. It is generally used to fill gaps or cracks on your wooden trims and/or drywall.
You may also use it to seal joints between two surfaces, such as between a window frame and sill.
Caulk is most commonly used in moisture-prone areas where two different materials meet, such as around the base of a toilet or in the kitchen where the countertop meets the backsplash.
It’s typically sold in tubes and can be applied with a caulking gun (I will discuss in a minute how).
Advantages of Using Caulk for Trims
The first advantage is that the caulk is versatile and can be used on different surfaces, indoors and outdoors.
This elastic material can be easily applied with a caulking gun and doesn’t require special skills or knowledge.
If there’s excess moisture in the air, it can cause the caulk to shrink and crack. While this can seem a drawback, it’s beneficial when you need to fill the larger gaps between the trim and the wall.
Because the caulking will spread easily, contract, and expand with the wall, it’s a fantastic option for areas prone to moisture and humidity, such as the bathroom or kitchen.
Another great advantage of this water-resistant caulking seal is that it’s very affordable, easily available at any hardware store, and can be easily removed and/or replaced if necessary.
Disadvantages of Using Caulk for Trims
While the caulk is a great filler substance, it does have its own set of drawbacks.
The first disadvantage is that it takes quite some time to completely dry or cure – sometimes up to 24 hours. During this time, you must be careful not to touch or disturb the caulk-applied area.
The second disadvantage is that caulk can be easily damaged or peeled off if not applied correctly. So, be sure to take time and be patient when applying it to your project.
And lastly, caulks are not as strong or durable as other types of fillers, such as wood fillers. This means that it’s not ideal for areas that receive a lot of wear and tear, such as around door knobs or in high-traffic areas.
When and How to Use Caulk for Wooden Trims?
As I mentioned, caulk is most commonly used to fill gaps or cracks in areas where two different materials meet.
This could be around the base of your toilet, sink, or bathtub, in the kitchen where the countertop meets the backsplash, or even around windows and doors.
Caulk can also be used to seal joints between two surfaces, such as baseboard corners, between a window frame and sill.
To apply caulk, you will need a caulking gun.
- Start by cutting the tip of the caulk tube at a 45-degree angle.
- After that, insert the tube into the caulking gun and squeeze the trigger to release the caulk.
- Then, run a bead of caulk along the joint or crack that you’re trying to fill.
- Make sure to apply an even layer of caulk and avoid overfilling the area.
- Finally, use your finger or a putty knife to smooth out the caulk.
- Make sure to clean up any excess caulk before it dries.
Now, let’s talk about wood filler.

What is Wood Filler – The Pros and Cons?
Wood filler is a type of substance that is used to fill cracks, nail holes, and dents in wood, MDF, particleboards, etc.
It’s also sometimes referred to as wood putty or plastic wood, and it’s most commonly used on wooden trims, floors, and furniture.
It’s typically made of wood pulp or sawdust that has been mixed with a binder, such as latex, epoxy, or shellac.
Advantages of Using Wood Filler for Trims
I think the biggest advantage of using wood filler is that it’s much stronger and more durable than caulk.
It is ideal for areas that receive a lot of wear and tear, such as around door knobs or in high-traffic areas.
Wood filler is also great for filling large cracks or holes in your wood pieces like MDF boards, planks, miter joints, etc.
And unlike caulk, it can be sanded down once it’s dry, which gives you a smoother finish to paint over.
Disadvantages of Using Wood Filler for Trims
The main disadvantage of using wood filler is that it’s not as easy to apply as caulk. You will need to use a putty knife or your fingers to apply it, and it can be quite messy.
Another disadvantage is that wood filler takes a lot longer to dry than caulk. It can sometimes take up to 48 hours for the filler to harden completely.
And lastly, wood filler is not waterproof, so it’s not ideal for areas that are prone to moisture.
When and How to Use Wood Filler for Trims?
Wood filler is a household remedy commonly used to fill cracks, holes, and dents in wooden trims, floors, and furniture. It can be used to repair damaged veneers, frames, paneling, and miter joints.
Wood filler is made of wood pulp or sawdust that has been mixed with a binder, such as latex, epoxy, or shellac.
The binder is what gives wood filler its strength and durability. To apply wood filler, you will need a putty knife or your fingers.
- Start by scooping out a small amount of filler onto the putty knife or your finger.
- Then, apply the filler to the crack, hole, or dent that you’re trying to fill.
- Be sure to smooth out the filler as you go.
- Once you’re finished, allow the filler to dry for at least 24 hours before sanding it down.
Can You Paint Over Caulk and Wood Fillers?
Well, this is an important thing you need to remember when using caulk and wood fillers for your trims and baseboards.
Since not all types are paintable, you need to get the wood fillers and caulk that can be painted over if you need to paint the surface after repairing.
Silicone caulk, for example, that can’t be easily painted over will not adhere to the paint and will eventually peel off if you apply the paint directly over it without any preparation work.
For paint to stick to normal silicone caulk, it must be covered or replaced with paintable caulk.
Alternatively, you can use oil-based enamel paint that can stick much more easily than latex or acrylic paints.
Wood filler, once set into the wood, can be covered with a coat of paint or stain, but you will need to create a proper adhesion by sanding it and applying the quality primer first before painting.
What about Spackling? Can it be used as a wood filler on trims?
The spackling compound is made from gypsum plaster from hydrated calcium sulfate and glue.
It’s similar to wood filler, but it’s not as strong or durable. This means you can use spackle to fill small holes and cracks along with other minor surface defects in the wood, drywall, and plaster.
If you don’t have any other specific options available, I would suggest you use the spackle only for indoor applications and not for the outdoors.
Final Thoughts: Caulking or Wood Filler – What is best for repairing the trims?
Generally speaking, caulk is best for filling the gaps and joints in the trim molding where flexibility is required.
Since the caulking can expand and contract with temperature changes, it’s ideal for the gaps on exterior surfaces that are prone to movement.
Wood filler, on the other hand, is made of a putty-like substance that hardens when it dries. It’s generally immovable and non-flexible, so it’s good to put them on when you are working indoors.
You can use it to repair small cracks, dents, or holes in wood surfaces along with filling the grains of the wood baseboards keeping its natural beauty intact.
Both of them will take time to dry, so be patient and let them do their job before you proceed to the next step, like painting or staining over.
Share the post "Caulk vs. Wood Filler – What to Use for Trims?"

One of the best ways to clean your yard of twigs, leaves, and tree branches after a storm is to Read more

Whether you have been working with wood all your life or just getting started, having the proper tools is a Read more
It’s possible to only use hand or manual tools when woodworking, but then it becomes a slower process. For certain Read more
If you have never used this, steel wool is a collection of very thin steel wires bundled together in the Read more

Hi, I am Mark Garner a professional carpenter, woodworker, and DIY painter. I live in the small city of Peoria, Arizona as a semi-retired woodworker. I have started this blog with a simple motive to help you with my wood experience in this sector. If you like to know more about what I love doing and how it all got started, you can check more about me here.