
The try and mitre square is a tool used to check angles and mark straight cuts. The try and mitre square itself is relatively simple.
They are made from two straight pieces known as the stock and blade which connect at either a 45 or 90-degree angle.
The try square checks 90-degree angles, while the mitre square is used to check 45-degree angles.
In addition, the 135-degree angle can also be found on the mitre square because of the 45-degree intercept.
The two parts of modern try and miter squares are detachable and adjustable, so you can measure other angles as well.
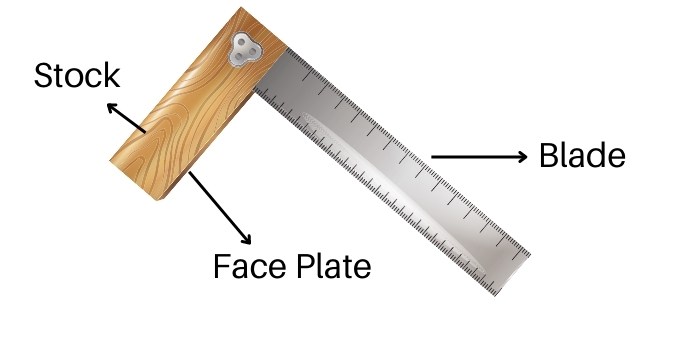
The Parts of Try and Mitre Square
There are two basic parts to the try and mitre square, the blade and the stock.
Understanding the differences will help you decide which materials are the best for your needs.
a) Stock:
Also called the handle, the stock on the try and mitre square supports the tool and is part of the angle-marking process.
For example, mitre squares have a 45-degree angle which can be found at either end. The stock gives the tool another measuring point.
In most cases, the stock is wider than the blade and often holds the blade in place.
This allows the stock to sit against the material that is being measured for greater accuracy.
b) Blade:
Despite the name, the blade is not used to create an incision or cut.
Instead, it is part of the tool that sits aside the edge of the material that you are checking.
The blade is where the mark or measurement will be made to ensure the angle.
For try squares, the angle is 90-degrees, for mitre squares, the angle is 45-degrees.
Such angles can be checked using the blade for either type of square.
c) Face Plate:
The face plate covers the stock part of the try and miter square. It is most often made of brass and designed to reduce wear on the stock.
You will most often find face places on stocks that are made of wood.
Stocks that are made of metal or plastic normally do not have face plates because the material itself is less likely to wear or become damaged compared to wood.
In addition, some try and mitre squares have extra features such as adjustable angles or scales.
Such features are normally listed on the packaging or catalog, so you can consider their attributes when making a purchase.
What are These Squares Made Up of?
The stock of a try and mitre square may be crafted from different materials.
The four most common materials that are used to create the stock of the try and mitre square include the following.
1- Brass:
Many face plates of wooden stocks are made of brass. The faceplates run along the sides of the stock to help prevent wear and tear.
Brass is one of the most common materials used to cover wooden stocks. This is because brass is easy to shape, yet tough and durable.
2- Metal:
The most common metal that is found on the stocks of try and mitre squares is aluminum. Sometimes, the aluminum is die-cast and anodized.
The former shapes the metal to what is desired while anodizing allows for colors to be placed on the metal.
In addition to aluminum, steel is sometimes used for the stock.
However, if the blade and stock are both made of the same metal that has roughly the same thickness, it normally means that there is no lip to secure the device.
The result is a less effective try and mitre square.
3- Plastic:
This material is more commonly found on stocks of the square.
The simple reason is that fiberglass-reinforced plastic is hard, durable, and relatively cheap to manufacture. The plastic is reinforced by fiberglass, making it quite durable and affordable.
4- Wood:
Given the age of the try and mitre square, wood may be the most common material used to create the stock.
Beech, rosewood, and other hardwoods are commonly used to create the stock.
Such hardwoods are well-suited because they are more durable, impact-resistant, and simply last longer compared to softwoods.
What material is the blade made of?
While the stock may be made from up to four different materials, the blade is often crafted from one basic material i.e., steel.
The most common types of steel used are stainless, hardened, strong-blued, and blued spring.
In any event, steel is commonly used because it is strong, durable, and will last with the proper care. Steel that has been blued is even harder, tougher, and more resistant to oxidation.
In terms of actual performance, the use of steel does not make the try and mitre square any more accurate or useful.
However, the use of stainless steel, in particular, is quite common due to its inherent strength, longevity, and resistance to oxidation.
With the proper maintenance, stainless steel blades for try and mitre squires can last a very long time.
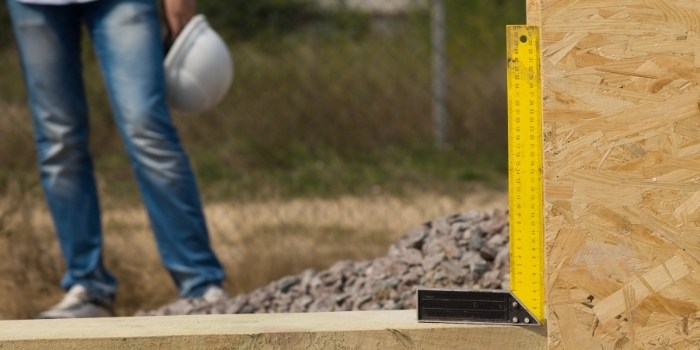
What are Try and Mitre Squares Used For?
There are two main reasons why the try and mitre squares are used. The first is to check the angles to see if they are correct.
A try square can check both the external and internal angles for 45-degrees and 135-degrees.
It is important that your angles are proper. Otherwise, they may not fit together properly, and your project will not look right.
The other purpose of the try and mitre square is to first measure and then mark angles.
While the miter and try square may only have two main purposes, it does open the way for other tasks that require right angles to work.
The uses of try and mitre squares include making stairs, building sheds, framing, and other, similar uses in the carpentry field.
You can also use them to check angles on machinery that cuts, such as bench saws and the like.
How Do You Use a Try and Mitre Square Correctly?
The try, mitre, and even the adjustable squares all work the same way.
For adjustable squares, be sure the angle is correct before you use them.
1- Place:
Place the stock against one edge of the angle, then slide the square until the blade is flush with the other edge.
2- Check:
Look for any gaps between the material and the square.
If you are checking the frame of a window, the light coming in from the other side will help you spot any gaps.
Try using a light source on the opposite side to verify that the angle is flush.
3- Measure:
If you are doing more than simply checking the angle, you’ll want to measure the distance from the edge. This will show you what is needed to be removed.
4- Place Again and Slide
Place the square again to check the angle. Now, move the square up to the mark you have made.
Stop when the blade and mark have met. You’ll want to mark the line again along the length of the blade.
5- Mark the Other Side:
If you need to mark the other side, use the same technique.
Now you are ready to make your cut.

Engineers Squares vs. Try Squares – What’s the Difference?
Used in both metalworking and woodworking, the engineer’s square is quite similar to the try square in terms of its function. Its main job is to check that the angle is 90-degrees.
That is to say, two sides that meet at a 90-degree angle. You can also use the engineer’s square to mark a 90-degree angle on the workpiece.
While quite similar in function, there are differences between the engineer’s square and the try square. Of the differences, the main one is how each tool is crafted.
The engineer’s square must conform to the British Standard BS9390. It also needs to be accurate on both the inside and outside of the blade and the stock.
The try square needs only be accurate on the inside edge.
Another difference is that the engineer’s square is made of all-metal construction.
The try square will normally have a metal blade, but the stock will usually be made from wood or plastic.
If made from wood, the stock will normally have a brass facing to help protect the material.
The engineer’s square will have a relief or groove where the inner edge of the stock meets the inner face of the blade.
The purpose of the relief is to prevent dirt, dust, or grime to get between the square and the workplace.
The result is that the engineer’s square will stay more accurate over time by preventing the buildup of unwanted materials between the stock and the blade.
The square dates back thousands of years to the time of the Ancient Egyptians and Greeks.
Squares were used in the construction of the pyramids, dating back to the 14th century BC.
At this point, most squares were made of wood, but some were crafted from metal and even stone.
The engineer’s square that we know today was first developed during the Industrial Revolution which began in the mid-18th century.
This was when accuracy was even more prized in terms of aligning machinery and creating more accurate measurements for larger structures.
The engineer’s square became even more desired as greater accuracy was in demand for the more sophisticated machines and structures being created.
When it comes to accuracy, the engineer’s square is preferred over the try square.
In fact, engineer’s squares are replacing try squares in many metal and woodworking aspects for professional jobs.

Tips for Maintenance and Care of Your Engineer’s Square
You’ll want to keep the proper angle of the try and mitre square correct.
If the tool is off, your angle will be off. This means that you will need to check the angle before using the try and mitre square for the day.
To check the angle, you should find a piece of scrap paper or wood that you can use to make the mark.
Place the try square flush along the flat side of the scrap wood or paper.
Now, use a marking pen or knife to mark the outer edge. Next, flip the square over to the edge that was just marked.
Hold the tool along the line that you just made and create another marked line on the other side.
Now, remove the square, and you should have two parallel lines that are as wide apart as the blade.
If they run parallel, then the square is angled properly at 90-degrees. If they are not parallel, then the angle is off.
If the angle is off, then you will most likely need to purchase a new square.
They are not that expensive and trying to fix your old one is probably not worth the effort.
But if you cannot buy a new one, then you will need to grind the edge down on the old one until it can create parallel lines.
It is possible to tap the blade back into position, but it will not be secure.
The proper care of your try and mitre square is relatively simple to achieve.
Because the wear and tear are relatively small, all you really need to do is wipe away any markings that make it on the device itself.
A simple wipe with a dry cloth or you can use a little soap and water if it becomes stained. Be sure to dry the try and mitre square after cleaning.
To store it, you can put it in the same toolbox as your other tools.
You may want to store it separately so that any bumps or knocks do not change the angle of the square. Otherwise, it should be fine in your toolbox or kit.

What Can You Use as An Alternative to Try and Mitre Squares?
What if you need the attributes of a try and mitre square but do not have one around?
There are other tools that you can use in the place of try and mitre squares to measure and mark angles.
Combination Square:
This device is quite similar to a try and mitre square. It can check angles of either 90 or 45-degrees.
Plus, the combination square has stocks that are interchangeable.
This allows you to find the center or middle of circles or be used as a protractor. The combination square is quite versatile.
Folding Square:
Sometimes called a carpenter’s square, this can be used in the same manner as a try and mitre square.
As the name suggests, it can fold into different angles. Plus, the carpenter’s square is often larger and may be shaped somewhat differently compared to a try and mitre square.
Sliding Bevel:
You can set the angle on a sliding bevel and then measure or mark it.
However, you will need other tools to ensure that the angle is correct, such as a protractor.
The sliding bevel is mostly used to mimic and transfer an existing angle.
One tool that you may not suspect can be used in the place of a try and miter square is a typical hand saw.
Many hand saws come with both 45 and 90-degree angles incorporated where the handle meets the blade.
This means that you can use the hand saw itself as a try and mitre square, mark the angle, and then use the saw to make the cut.
Things to Consider when Selecting an Engineer’s Square for Woodworking
If you are considering an engineer’s square for woodworking, then you will need to prioritize the following.
- Size of Workpiece
- Accuracy Needed
- Additional Features
- Individual Purchase or Purchasing a Set
You will need to purchase an engineer’s square that is comparable to the workpiece – you intend to use it on.
Engineer’s squares typically come in blade lengths that range from 2” up to 40”. It’s better to purchase an engineer’s square that has a blade a little too long compared to one that has a blade that is a little too short.
Although you may be tempted to purchase a Grade A or AA engineer’s square, these are mostly used for calibrating tools and in laboratory conditions.
A Grade B engineer’s square is quite accurate for most jobs and is far less expensive to purchase.
Many companies will sell a set of engineer’s squares. This allows you to typically purchase four squares at once, sometimes more or less, depending on the company.
One advantage besides having different sizes of engineer’s squares is that they come in a case for easy storage.
However, if you only need one size of engineer’s square, then purchasing a set is a waste of money.
Stock or No Stock:
The stock tends to be considerably thicker, so you may be tempted to purchase an engineer’s square that has essentially two blades instead of a blade and a stock.
The advantage is that you can use either blade for measuring, but the downside is that the blades tend to be thin and more easily damaged.
Graduation Marks:
Another consideration is to have graduation marks on the blade, so you can use the same tool for measuring and marking the angle.
This can be quite handy, especially if you are making numerous angle checks and measurements.
Share the post "What are Try and Mitre Squares – What Do You Use Them For?"

One of the best ways to clean your yard of twigs, leaves, and tree branches after a storm is to Read more
Whether you have been working with wood all your life or just getting started, having the proper tools is a Read more
It’s possible to only use hand or manual tools when woodworking, but then it becomes a slower process. For certain Read more

If you have never used this, steel wool is a collection of very thin steel wires bundled together in the Read more

Hi, I am Mark Garner a professional carpenter, woodworker, and DIY painter. I live in the small city of Peoria, Arizona as a semi-retired woodworker. I have started this blog with a simple motive to help you with my wood experience in this sector. If you like to know more about what I love doing and how it all got started, you can check more about me here.