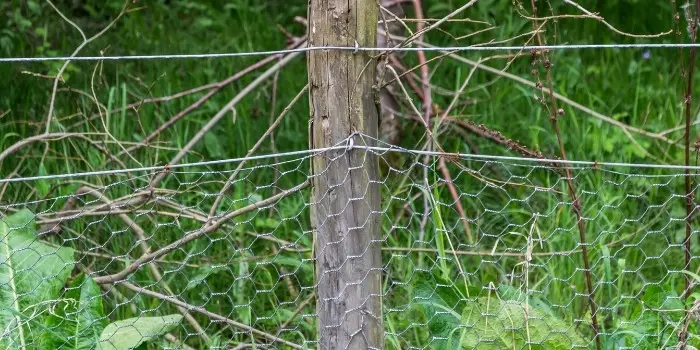
A chicken wire fence with t-posts is basically a type of fence post that is made out of “chicken wire”.
Here, the chicken wire is attached to wood to create a security system for your property.
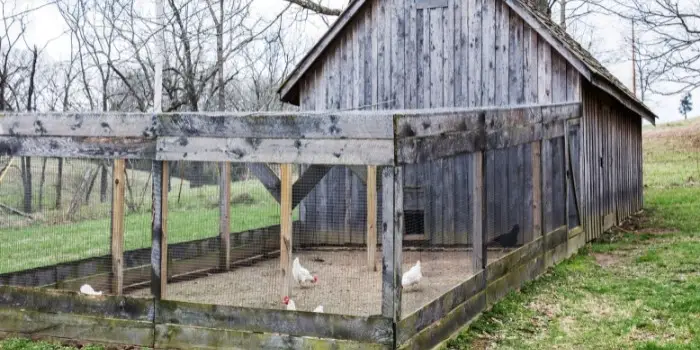
Not only for wire mesh fences, but you can also use chicken wire on a wooden pathway or to make wooden cages for your birds. It’s also an essential piece of equipment for poultry farmers to keep their chickens safe.
This guide will show you how to attach chicken wire to wood using simple steps and materials without spending hours.
So, let’s get into them without any delay.
Are Chicken Wires Safe?
Yes, chicken wire is generally safe when installed correctly. It is designed primarily to contain poultry and deter small animals, rather than withstand heavy pressure.
The hexagonal mesh pattern provides flexibility while maintaining enough strength for lightweight fencing.
However, because the wire edges can be sharp after cutting, it’s best to wear work gloves and safety glasses during installation.
For animals, chicken wire is considered safe as long as it is properly secured and there are no protruding ends that could cause injury.
It’s also important to note that chicken wire is better suited for containment rather than predator protection, since determined predators can sometimes bend or tear thin mesh.
Constructing Chicken Wire Wood Fence
Building a chicken wire fence is one of those weekend projects that looks simple—until you realize the chickens, rabbits, and curious dogs are all better engineers than you expected.
With the right materials and a bit of planning, though, you can build a fence that’s sturdy, practical, and long-lasting.
Here’s a straightforward step-by-step process.
Step 1. Start by buying the right chicken wire mesh
Not all wire mesh is created equal. For most backyard fencing, galvanized chicken wire with 1-inch hexagonal openings works best.
The galvanization protects the steel from rust, and the smaller openings keep out small predators.
A typical roll is 20–24 gauge, which is flexible enough to work with but still strong enough for a light fence.
If durability is your top priority, go for galvanized-after-weaving (GAW) wire—it resists corrosion much better than the cheaper galvanized-before-weaving type.
Step 2. Plan the fence layout and mark the line
Before digging anything, mark the fence line with stakes and mason’s string.
This helps you keep the fence straight and ensures the spacing between posts stays consistent. Most small fences work well with post spacing of 6–8 feet.
Take a few minutes here—the straighter the layout, the easier everything else becomes.
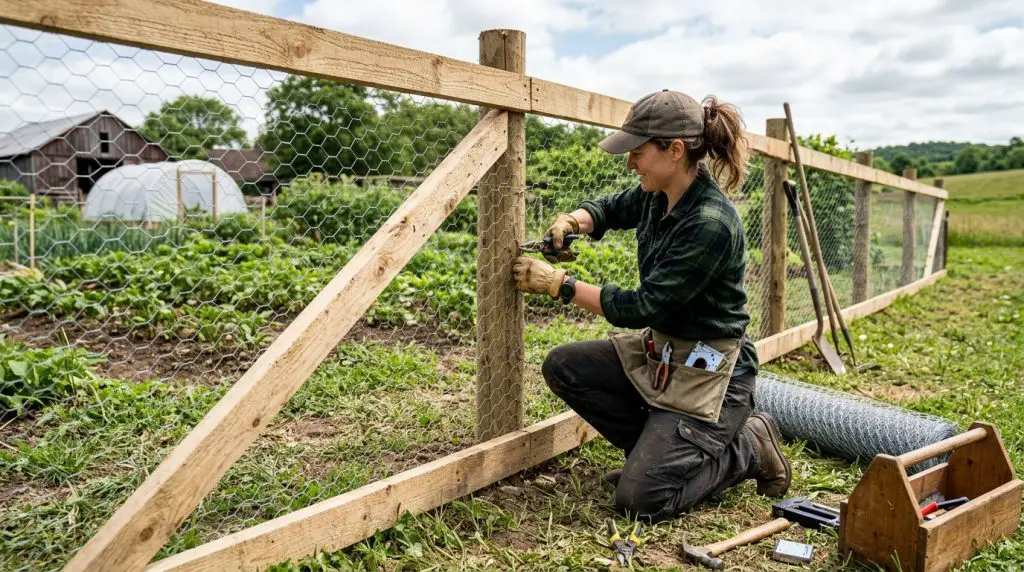
Step 3. Install the wooden fence posts
Your posts are the backbone of the entire structure. Use pressure-treated wooden posts (typically 4×4 inches) to resist rot and insect damage.
Dig holes 18–24 inches deep, depending on soil conditions and frost depth.
Set the posts with gravel or quick-setting concrete and check them with a level before the mix hardens. A solid post today saves you from leaning fences tomorrow.
Step 4. Attach horizontal support rails (optional but recommended)
While chicken wire can be attached directly to posts, adding horizontal rails—usually 2×4 lumber at the top and sometimes the middle—greatly improves stability.
These rails give the wire more surface to fasten to and prevent sagging over time.
Step 5. Unroll and stretch the chicken wire
Unroll the mesh along the fence line and pull it tight before fastening. Chicken wire naturally wants to curl back into its roll shape, so tension matters.
Many builders use a fence stretcher or a simple wooden board with clamps to distribute the tension evenly across the mesh.
Step 6. Secure the wire to the posts and rails
Attach the wire using galvanized fencing staples or heavy-duty staple gun fasteners.
Place staples roughly every 6–8 inches along the posts to keep the mesh firmly in place.
Make sure the wire is taut but not overstressed—over-tightening can distort the hexagonal pattern and weaken the wire.
Step 7. Finish the bottom edge and check for gaps
For extra protection, especially if the fence is meant to keep your pet animals in or out, bury the bottom 6 inches of the wire in soil or bend it outward along the ground to create a small barrier apron.
Walk the entire fence line afterward and check for loose staples, gaps, or sharp edges.
What Type of Wood Can Hold Chicken Wire?
Most standard fencing lumber can support chicken wire effectively.
Pressure-treated pine is the most common choice because it resists moisture, insects, and decay.
Cedar is another excellent option since it naturally repels insects and holds staples well without splitting easily.
For structural parts of the fence, builders often use 4×4 posts and 2×4 rails, which provide a solid frame for attaching the mesh.
The key requirement is that the wood should be strong enough to hold galvanized fencing staples firmly over time.
Do you need to finish the wood you’re using?
Finishing the wood is not strictly required, but it is highly recommended for longevity.
Exterior wood used in fencing is constantly exposed to sunlight, moisture, and temperature changes, which can cause cracking or warping.
Applying a weather-resistant stain, sealant, or outdoor wood preservative helps protect the surface and extend the life of the fence.
If you’re using pressure-treated lumber, the wood already has some built-in protection, but sealing it after a few months of drying can still improve durability.
What is the Purpose of Chicken Wire on a Wooden Pathway?
Chicken wire is sometimes installed on wooden walkways, decks, or garden pathways to provide additional traction and safety.
The textured metal mesh creates a non-slip surface, which is particularly useful in areas that become wet, muddy, or icy.
Gardeners and farmers often use it on ramps leading to animal enclosures or coops so that both people and animals can walk securely without slipping.
In outdoor environments, this simple layer of mesh can significantly improve stability on otherwise smooth wooden boards.
How Do You Remove the Chicken Wire Mesh from Wood if Needed?
Removing chicken wire from wood is usually straightforward. Start by locating the fencing staples or nails holding the mesh in place.
Using tools such as pliers, a flat pry bar, or a staple puller, carefully lift the fasteners from the wood. Once several staples are removed, the mesh can usually be pulled away in sections.
If the wire has been installed for a long time, some staples may be rusted or embedded deeper into the wood, in which case gently prying them loose prevents unnecessary damage to the lumber.
After removal, it’s a good idea to sand or fill any small holes left behind before reusing or refinishing the wood surface.
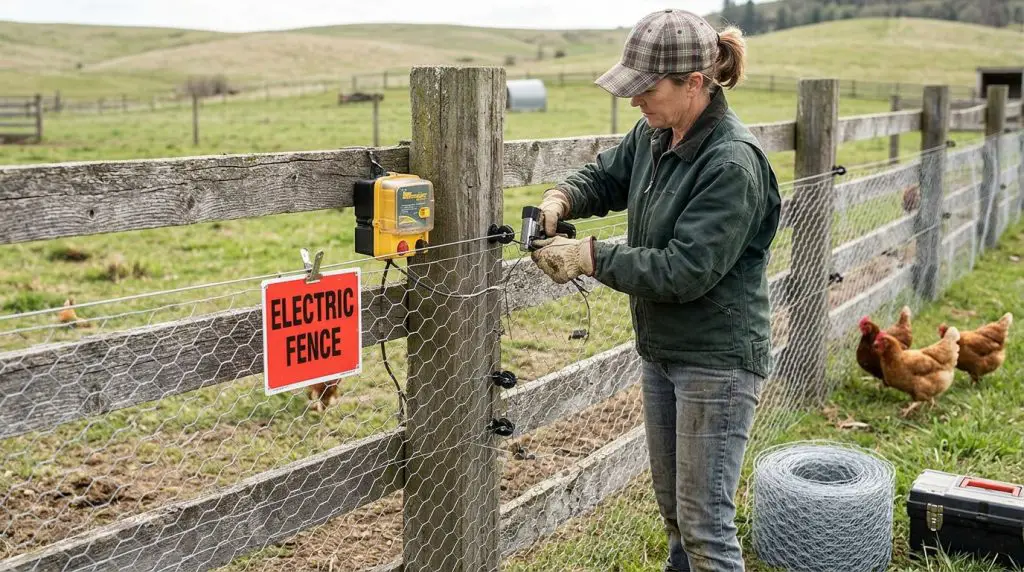
Can You Electrify Chicken Wire with Staples Attached to a Wooden Fence?
Yes, you can electrify chicken wire attached to a wooden fence—but it must be done carefully and with the correct setup.
Simply connecting an electric charger directly to the chicken wire that’s stapled across wooden posts and beams isn’t recommended.
Chicken wire has many contact points and tends to lose voltage quickly, which reduces the effectiveness of the electric current.
A better approach is to install separate electric fence wires along the outside of the fence using plastic or ceramic insulators.
These insulators keep the energized wire from touching the wood structure or the metal mesh.
When an animal approaches the fence—whether it’s trying to enter a pen or escape a cage—it contacts the electric wire first and receives a harmless but memorable shock.
Another reason not to energize the mesh itself is durability.
Chicken wire is relatively thin (often 20–24 gauge), and running electricity directly through it can lead to grounding issues if vegetation in the garden touches the wire or if staples make unintended metal contact.
In short, use the chicken wire as the physical barrier, and let the electric wire act as the deterrent. This combination keeps the fence safe, efficient, and far more reliable in protecting your animals.
Final Thoughts
Combining chicken wire with wood is a practical and affordable way to create a reliable barrier or fence line around your property.
When installed properly, this simple pairing can provide effective protection for gardens, animals, or outdoor spaces while keeping the structure lightweight and easy to maintain.
By following the steps outlined in this guide, you can approach the project with greater confidence—and hopefully build a fence that is not only functional but also well-constructed.
Be sure to use appropriate fasteners, such as galvanized fencing staples, corrosion-resistant screws, or outdoor-grade nails. This helps prevent rust, keeps the wire securely fastened to the wood, and preserves the fence’s structural integrity over time.
Share the post "How to Attach Chicken Wire to a Wood Fence Securely?"
Termites are recognized as one of the most troublesome pests all over the world. They are small and numerous and Read more

Our bedroom is a special place where we find relaxation and refresh after a hard day of toil - the Read more

Let’s be honest: buying a sofa is a bit like dating. In the beginning, it’s all about the looks. You Read more

Wooden furniture, trims, doors, and windows are so long-lasting that you can easily repair and reuse them even after they Read more

Hi, I am Mark Garner a professional carpenter, woodworker, and DIY painter. I live in the small city of Peoria, Arizona as a semi-retired woodworker. I have started this blog with a simple motive to help you with my wood experience in this sector. If you like to know more about what I love doing and how it all got started, you can check more about me here.